
When it comes to a user’s Remote Access, Cisco’s AnyConnect has been a leader. It just works. That has been my experience as a user. That experience is also consistent for a user if their remote connection has a headend of an ASA or Firepower. However, one thing to note is that the backend administration and setup of Remote Access is different between the two. The ASA’s Remote Access setup has many bells and whistles that Firepower does not, but Firepower’s setup is pretty simple. We’re going to be setting up Remote Access using Firepower, but we are also going to leverage the Cisco Identity Services Engine for authorization policies as well as Cisco Duo for that extra layer of Multi-Factor Authentication protection.
Real-world Thoughts:
Remote Access has been around forever. It is an area attackers can enter your enterprise. We have to do what we can to add additional layers between ourselves and the outside world especially when our employees are all over the world across many different networks. MFA all the things! This is why we are using Duo. When employees jump on the VPN, they need to verify the connection really is coming from them and not an attacker who happened to obtain login credentials from a successful phishing campaign. Firepower’s IPS will take a deeper look at the traffic traversing the firewall. If you use this in conjunction with Advanced Malware Protection (AMP), you provide a bit more security for the actual traffic that makes it across the firewall. ISE makes sure everyone stays in their lane. If there are deviations, users can be quarantined or other actions can take place while an investigation takes place.
Before We Start:
Before you dive in, I’m going to mention what you should already have setup in the environment. This entry won’t be covering their individual setups. We won’t be diving in too deep into some of the components, like certificate creation. This entry is going offer a “medium-level” look at this solution :
- Duo Proxy – The Duo Authentication Proxy contains your Duo settings and keys for the applications you protect with Duo Security MFA. The proxy can perform primary authentication to a backend directory you host and it performs secondary authentication to Duo’s cloud.
- User Accounts – Active Directory houses the accounts in this example. We won’t be diving into that. Keep in mind, you have other options of where to create account besides Active Directory, including accounts on ISE.
- Firepower Management Center (FMC) – Managing Firepower and making changes actually occurs on the FMC. From there, changes are deployed to the individual firewalls. We won’t be covering the setup of the FMC itself.
Duo Setup
If you are familiar with Duo, you’ll know that protecting users begins with adding an application. I won’t dive much into this section as I find Duo provides great documentation on the inner-workings for administrators.
- Under Applications > Protect an Application, add in the Firepower Threat Defense VPN application.
- Adding an application will provide you with the needed Integration Key, Secret Key and the API hostname. You’ll need to edit the config file in your Duo Authentication Proxy with this information. You can refer to Duo’s Firepower documentation for the details on how this gets added in.
- When you configure your Duo Authentication Proxy, you will configure the application to use the radius_client for primary authentication. That radius_client section in your proxy config file will contain your ISE Node IP addresses and RADIUS secret. The reason for this is that the Duo Proxy does not actually authenticate you. It has no knowledge of your credentials. It still needs to refer to the authentication server. The authentication server will be ISE.
Firepower Setup
Once you have added in the Firepower Threat Defense VPN app and configured your Duo Authentication Proxies, we can move on to the Firepower Remote Access setup. If you’ve only setup RA on an ASA, you’ll find the Firepower RA setup to be pretty straight forward. There are not that many nobs and buttons. One thing I do miss are the Dynamic Access Policies (DAP) that the ASA has. Firepower does not, at least at the time of this writing, offer DAPs. This is why later on we will leverage Cisco ISE.
- Let’s get a few objects going that will be needed during our RA setup. Under Objects > Object Management we’re going to head down to the PKI section. Here under the Cert Enrollment section, you will want to setup a certificate for your VPN headend. Most of the time this cert should be a public cert. In other words, you or the org should pay money for a certificate. However, in a lab scenario, this can be a self-signed. Using a public cert authority is the way to go.
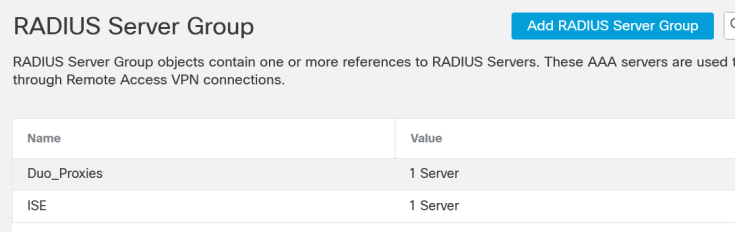
- Under Object Management scroll down until you reach the Radius Server Group section. Here we want to create two groups:
- Duo Proxy Group: This group contains your Duo Authentication Proxies. You should have multiple proxies for redundancy purposes; add them in. The RADIUS secret you configured under the Firepower section in your Duo Auth Proxy will be what you will use as the key here.
- ISE Group: This group contains your ISE nodes.
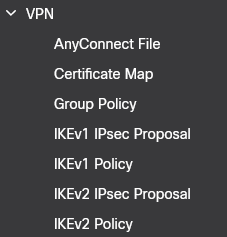
- Staying under Object Management, lets scroll a bit further to the VPN > AnyConnect File section. No AnyConnect setup is complete without actually having the AnyConnect software. You’ll be able to download the latest from Cisco.com (with a valid contract of course). Once you have the software, you can upload it here. This is also where you upload the AnyConnect XML profiles you want users to download upon login to the VPN. The profiles contain VPN configurations that are applied to the user themselves (like backup VPN servers).
- From here we are going to visit the wizard (no this wizard does not have a long beard). Under Devices > Remote Access we will want to add a new Remote Access VPN Policy by clicking the Add button on the right side. The wizard shall begin!
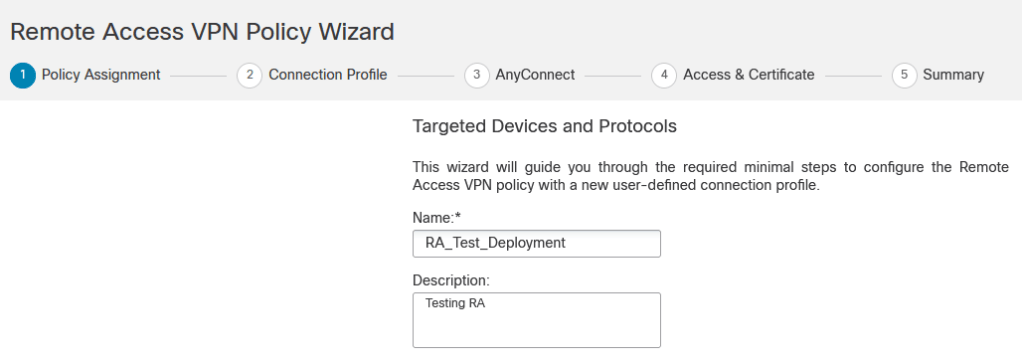
- Name your VPN policy. You’ll notice at the top that the policy creation will run through 5 steps. On this page you will select your VPN Protocols (IPsec-IKEv2 and/or SSL) as well as what devices will use this particular policy. Click Next.
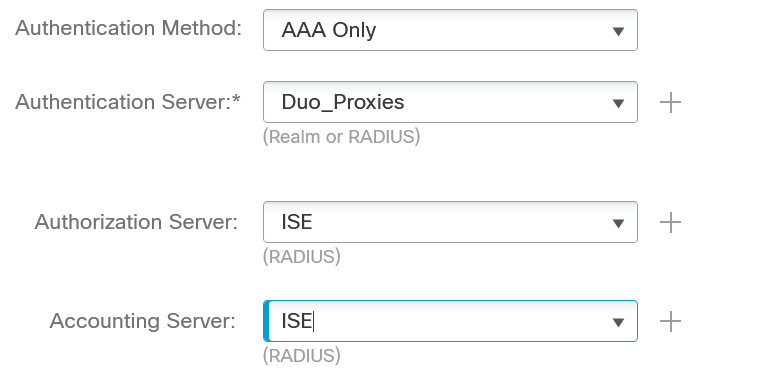
- Create the Connection Profile. These are the settings users see before they login to the VPN. You will select your AAA components. Authentication will be handled by the Duo Proxy RADIUS group you created earlier. Authorization and Accounting will be the ISE RADIUS group you created.
- On this same page you will select/create the IP Pools you want VPN users to use. DHCP is also an option to utilize to assign IP addresses to users. You dont have to assign IP addresses here, you can do this later in the Group Policy section as well.
- At the bottom of this page the Default Group Policy is called DfltGrpPolicy (I know, shocking!). You can utilize the default group policy, however you can also create additional group policies for different groups who will login to the VPN. For example, if you want a different set of IPs to be assigned to HR or contractors, you can control this via the group policies. The settings within the group polices is what users pull after they authenticate. Later on, we will assign different group policies using ISE. Click Next.
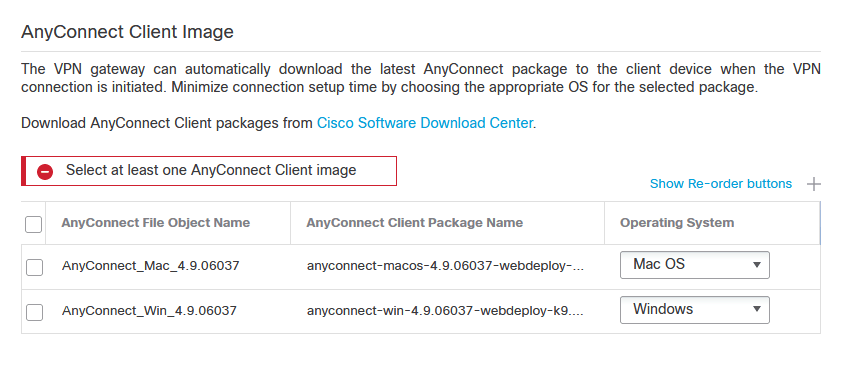
- Wizard step 3 allows you to select the AnyConnect files you uploaded earlier. They should automatically show up assigned to Windows, Mac OS or Linux, but you can make changes here if you uploaded multiple versions of AnyConnect. Click Next.
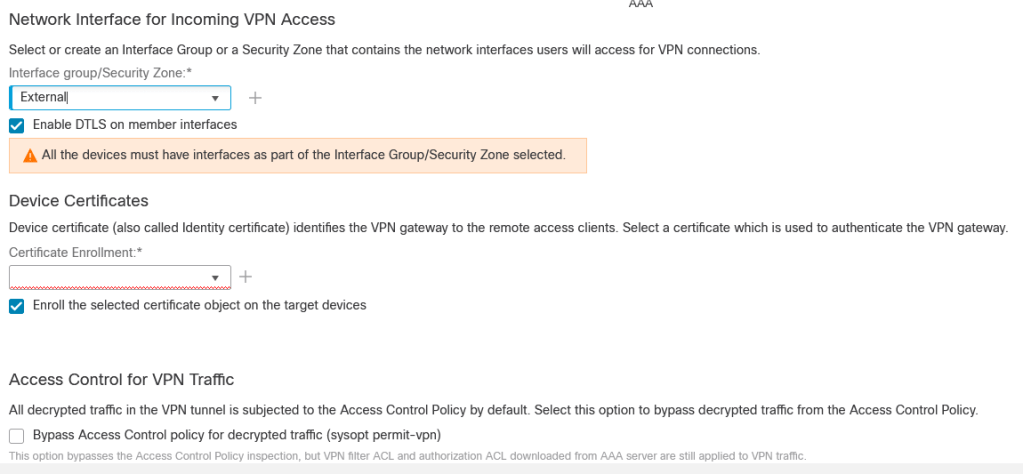
- Remember that certificate you created? Here is where you put it to use. First, select the interface you are enabling the VPN service on (usually the Outside/External interface). Scroll down and select the certificate you created earlier. You can also create the cert here if you did not earlier. Click Next.
- Finally wizard step 5 is simply a summary of what you have configured with the wizard so far. If all looks well, click Finish to finalize this policy.
- As all of this configuration occurred on the FMC, it still needs to be deployed to the firewall/s. At the top of the page, select Deploy > Deployment, select the firewall/s and finalize the config by clicking the Deploy button.
ISE Setup
The Identity Services Engine (ISE) will be our last stop. On the ASA, I would create an access-list and tie in an Active Directory group together into a DAP. This would control which users would be able to access certain resources. However, at the time of this writing, Firepower does not support DAPs. We can accomplish the same goal with ISE. As a matter of fact, it is probably the better route to let ISE handle what users can or cannot do. There is so much more you can do with ISE once you have users authenticating.
- Under Administration > Network Devices you’ll want to add in your Duo Authentication Proxies. The RADIUS secret will match what you have added to the Duo Authentication Proxy config file. The Duo Auth Proxy will come back to ISE to authenticate users. Accounts should either be local or ISE reaches back to another external source like Active Directory.
- Under Policy > Policy Elements > Results find the Authentication > Allowed Protocols section. You’ll be creating a new service that allows certain protocols from devices. Normally, PAP/ASCII would be allowed for text, however I have a requirement of allowing users to change their password from the VPN. This is an option back in the Firepower VPN Connection Profile you created earlier. According to the errors I would get when attempting to authenticate, MS-CHAPv2 also needs to be allowed. You can play around with the protocols to suit your environment and needs. The Live Logs within ISE (as well as the Duo Proxy Auth logs) are pretty helpful at showing you what the issue is if you cannot authenticate.

- Under Policy > Policy Elements > Results find the Authorization > Authorization Profiles section. Here is where you would create one Authorization Profile for each Group Policy you created on Firepower. The Access Type for this profile will be Access_Accept. On this same page, scroll down in the Common Tasks section and fill in the ASA VPN box with the exact name of the Firepower Group Policy you want this Authorization Profile to match. Originally, I used the Advanced Attributes Settings custom section to add in the setting under Cisco/Class 25, but this was changed to the ASA VPN automatically after saving the entry.

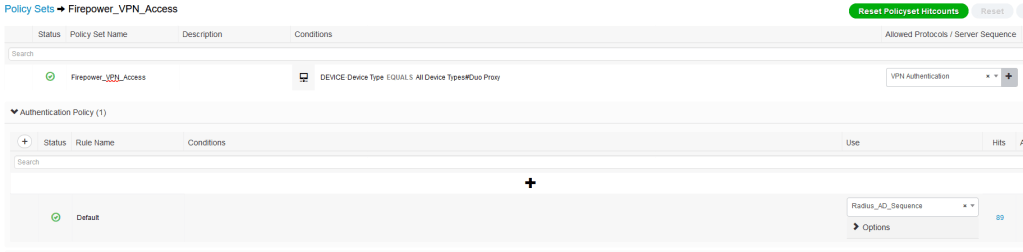
- We’ve allowed the Duo Authentication Proxies and we’ve created Authorization Profiles. Let’s create the Policy under Policy > Policy Sets. As you can see in the image below, our policy is only looking for authentication coming from (Device Type EQUALS) our Duo Proxies. On the right side is the Allowed Protocols we created earlier.
- Once an attempt coming in matches this policy, we move on to the Authentication Policy section. This is where the user’s credentials are checked with our External Identity Source.
- Now for our Authorization Policy. Here we create an entry for each of the Group Policies we want to match on Firepower. I’m matching Active Directory groups. If the user comes in from a particular group, they would be sent to a different Group Policy on Firepower. On the right side is the Authorization Profile I created earlier. That is the profile that tells Firepower what to do with you once you authenticate. The default PermitAccess sends the user to the default Group Policy.

That is it! I fired up AnyConnect, tossed in my credentials, and received a Duo push. You can check ISE’s Live Logs to validate. The policy also keeps track of the “Hits”. You can also validate in the Duo admin dashboard:

I look forward to hearing about any attempts you’ve had at this or even if you found a different way to accomplish this with the same components.

Leave a comment